Developing UIViews in Xcode Playgrounds
Some tips and examples from the Topology app
Posted on by Alexis Gallagher
Last week, Agnes gave a talk on how we use–and love!–Auto Layout here at Topology.
The talk was at NSMeetup, the local San Francisco meetup for iOS development, and someone in the audience asked if you can use Auto Layout in Xcode playgrounds.
Answer: yes, you can! And playgrounds are great for UI development – flawed, but great.
There are WWDC sessions that go through the ins and outs of playgrounds. But since it seems like it’s not a common practice, I thought it might be interesting to share a few notes and examples of how we have used playgrounds developing the Topology app.
What are playgrounds good for?
They’re great to … play!
More exactly, they’re great when you want rapid, iterative development of a well-isolated module. This is often the case when you’re developing a moderately complex custom UIView subclass.
What are the benefits?
Speed. Although you could develop the view by repeatedly doing Build & Run on your app, you’d waste a lot of time compiling and then navigating through the app to the new view. So playgrounds can be faster, which keeps you in a state of flow.
Focus. Developing a view in the context of an app is distracting. Seeing and working on a single view in isolation help you focus on the problem at hand rather than get distracted by the rest of the app.
Enforced modularity. If you develop your view within your app, you will be tempted to think of the view as an outgrowth of your app, and to build it in such a way that it depends on your app.
This final point is an important one: you might build a view to be configured by your app’s model type, like your User type. Or you might place key logic in the view controller expected to use the view. But oftentimes this is not necessary and you’d be better off to develop your custom view in the way Apple would, with a clean external API that relies only on standard basic types like String and UIImage.
If you also need the view to have an API that does rely on the app’s custom types, you can layer that on afterwards with an extension. In fact, this more modular design is preferable.
But what’s not good?
That said, every rose has its thorns, and even your neighborhood playground may have a few inexplicable empty beer cans lying around by the preschool swing set.
First, full disclosure: Xcode playgrounds and Swift Playgrounds on the iPad are a bit unstable. Sometimes, even if you do everything right, they will crash or hang. In those cases, you have to quit your playground and restart. Sad, ridiculous, but true.
(Eric Sadun’s advice is excellent, so her simfix shortcut is certainly worth a try.)
Beyond that, the main downside is that developing UI in a playground requires a few tricks that are fairly simple but obscure and therefore easy to forget. The example playgrounds below show most of these, so hopefully they are a good starting point for your own exploration.
Key points to remember
Okay, let’s get to brass tacks. Here are the key points to remember when using playgrounds for UI development:
At the top of your playground page, you should
import PlaygroundSupport.To display a view or a view controller, assign it to
PlaygroundPage.current.liveView.To actually see the view in Xcode you need to reveal the Assistant Editor.
CMD-OPT-<enter>will do this, or you can use the segmented control in the toolbar. Then make sure the dropdown in the jump bar is set so that the assistant editor shows a Live View, not a generated interface or something else.You can include read-only assets like images by putting them in your playground’s
Resources/folder, then access them with the usual FoundationBundleAPI.You can also write to the filesystem by building a path based on the directory provided by
playgroundSharedDataDirectory. Oddly, this will be the directory~/Documents/Shared Playground Dataand is shared across all playgrounds.You may need to manually trigger layout. This is important but subtle. In an app, UIKit creates a run loop, which is always in the background, repeatedly running your layout and drawing code when needed. But a playground runs once, like a script. So you may need to manually invoke layout or drawing, for instance by invoking
setNeedsLayout()andlayoutIfNeeded()at the end of your script.If you don’t want your playground automatically recompiling and re-running after every edit, which is the default, you should use the dropdown at the bottom of the edit window to switch the playground from Automatically Run to Manually Run.
You can also move helper code into
Sources/. If your single playground page gets so long it takes forever to compile with every change, then you can move finished code into theSources/folder. This code will be compiled less frequently and run more efficiently. It will be automatically imported into your playground page as a module so you need to make sure the code there has apublicAPI to be visible to the code in the page.If you want to explore more advanced, asynchronous operations in a playground, like network downloads or video transcoding (we’ve done both!), you may need to set
PlaygroundPage.current.needsIndefiniteExecution = trueso the playground does not quit execution when it gets to the final statement.
Playgrounds of Topology
That’s a lot to take in. Here are three of the dozens of playgrounds that are lying around our repo, as remnants of earlier development. If you learn better by seeing real examples and tweaking them, download and try them out.
Chevron Playground
All of the views in The Chevron Playground were used for building components in an earlier version of the selfie-capture flow, the sequence of screens in the app that instruct the user how to take a seflie that can be used for our augmented reality virtual try-on experience.
Before updating the system to rely on real-time face detection and pose detection, we used music and visual cues to guide the user’s pacing as they turned their head. Visual cues means a lot of custom UI!
This playground was used to develop an early version of the “chevron”, a triangle that directs the user where to turn their head.
This is a simplified playground example: just a view that draws a triangle! But it shows a few important things:
- How you can put all your view definitions and the view-hosting code
in one playground page. - Using an image asset in
Resources/ - How to define a UIView based on a
CAShapeLayerrather than based
on drawing code indrawRect. (This has performance benefits that
are probably irrelevant in most cases.)
![]()
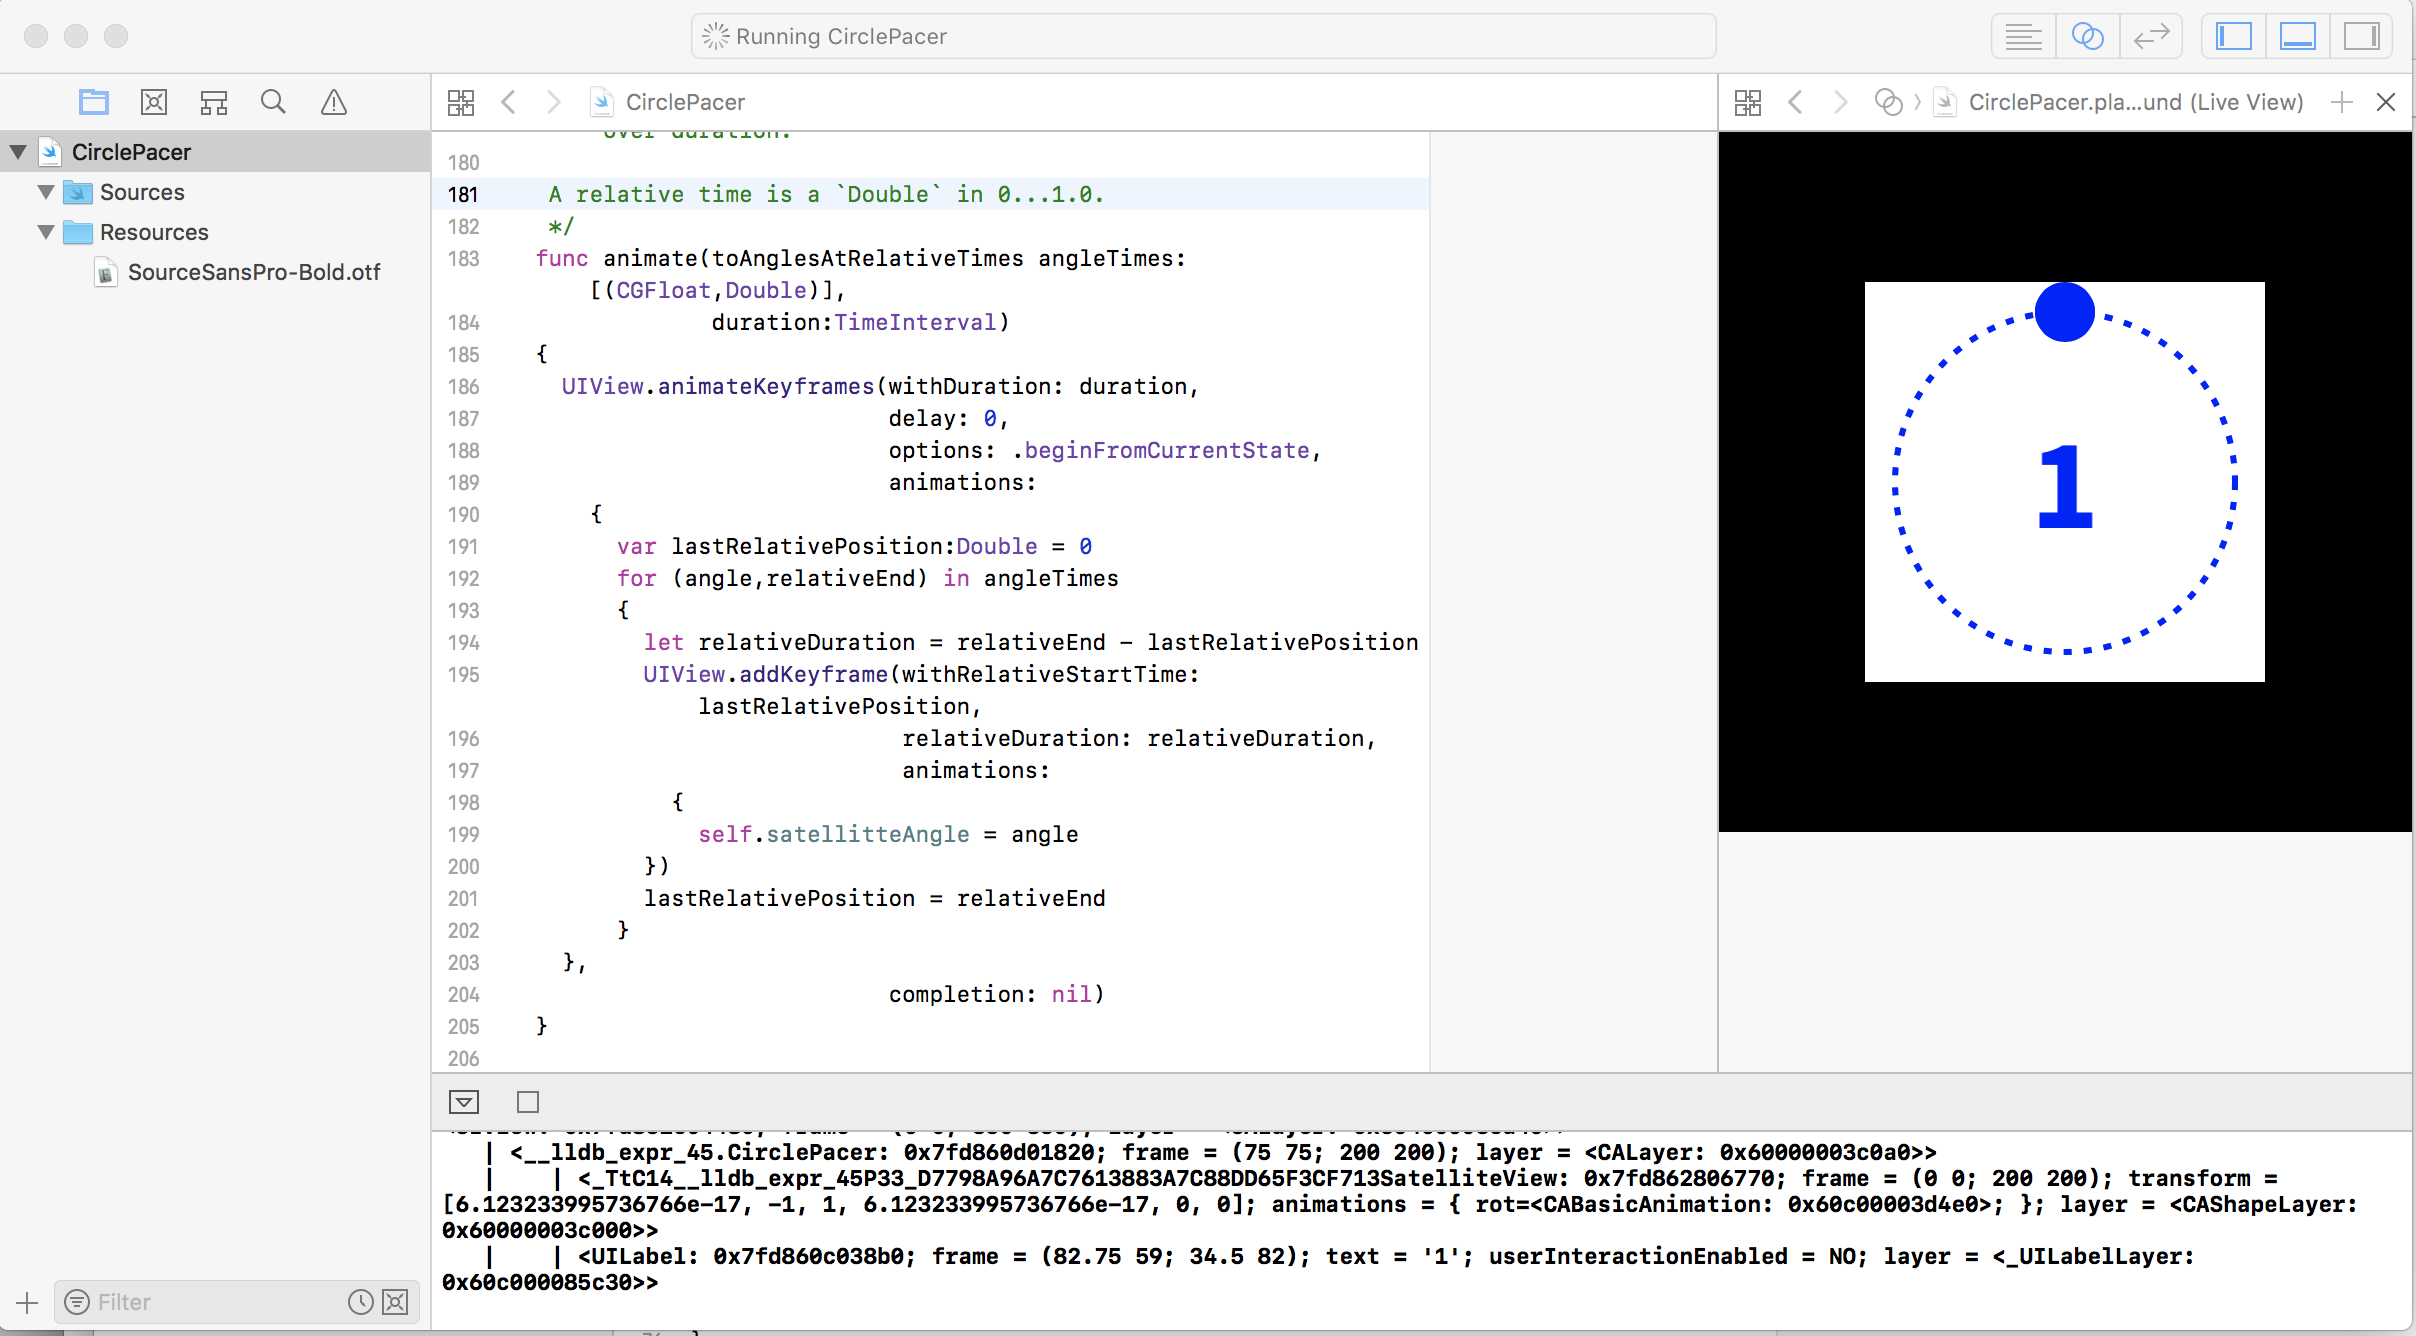
Circle Pacer Playground
The Circle Pacer Playground view shows a circle orbiting a circle with a countdown in the middle.
This playground shows the following:
- Traditional drawing via
drawRect(instead of usingCAShapeLayer) - Manual layout without
layoutSubviews - Font-loading on a playground, via an asset in
Resources/ - UIKit animation
- Using Swift’s computed properties to create a natural external API
Chevron Edge View Playground
The ChevronEdgeView Playground uses the Chevron view to define a view that can present the hinting chevrons at the screen’s left side, right side, or both, and allows you to configure where the arrows are pointing, how big they are, and their color.
Probably the most interesting things it shows are:
- Using Auto Layout to assemble constituent views into a responsive view
- Moving helper code into
Sources/, so only hosting code is in the playground page, so it operates only on the view’s external API - Drawing code to define shape views
![]()
The Limits of Playgrounds
To summarize, what’s good about playgrounds is that they provide isolation and rapid iteration. What’s bad is that they need a few tricks to be useful and that they become cumbersome beyond a certain level of complexity.
The tricks you only need to learn once – checkout the examples above.
But the cumbersomeness problem increases with complexity. It’s because they recompile and re-run on every change, and because they run once rather than in an event loop. This means your code is in an execution context different from a plain old app. If you find yourself working in a very complex view, and playgrounds aren’t cutting it, it might be worthwhile to dump playgrounds and build an entire dedicated test rig app, an app designed to do nothing but host your view. This usually feels like it’s not worth the trouble, but then is. We’ve also done this more than once, such as for the card and article presentation views, and for the design picker view, which lets customers select the frame style, material, and lens for their glasses.
But really, you can stretch playgrounds quite far if you want to. For instance, this Synchronous Download Playground shows four different ways you can use Foundation API in order to wrap asynchronous networking code into a synchronous API. With methods like these, playgrounds can be quite useful beyond UI, even for iterating on networking code.
Beyond Playgrounds
It’s also worth mentioning the wider context. Swift Playgrounds are, for the moment, still catching up with what exists on other platforms. The interactive development workflow of playgrounds is just one incarnation of a general class of technologies for interactive computing, which includes the interactive prompt (or REPL, as lispniks like to call it) and notebook computing more generally.
In the JavaScript world, people use tools like CodePen every day to interactively develop, and share, pieces of code. The commerical system Mathematica has for years offered a comprehensive, well-integrated notebook-computing environment, which lets you mix text, images, code, and code outputs in one place. And right now, in the data science and machine learning world, the big story is the rise of Jupyter notebook, a powerful open-source notebook computing system. It supports multiple languages. It’s based on the browser and standard technologies like JS and Python. It’s tech stack is a bazaar, not a cathedral. Being based on the browser, Jupyter can integrate everything and is gradually doing so.
In fact, you can just barely run Swift within a Jupyter notebook. If you have Docker installed, this command will run a Jupyter server that offers either Swift 4.1 or Swift for TensorFlow: docker run -t -i -p 8888:8888 --privileged algalgal/swift-tensorflow-notebook:e539cdea6632
But that’s a story for another blog post!