Last week, Agnes gave a talk on how we use–and love!–Auto Layout here at Topology.
The talk was at NSMeetup, the local San Francisco meetup for iOS development, and someone in the audience asked if you can use Auto Layout in Xcode playgrounds.
Answer: yes, you can! And playgrounds are great for UI development – flawed, but great.
There are WWDC sessions that go through the ins and outs of playgrounds. But since it seems like it’s not a common practice, I thought it might be interesting to share a few notes and examples of how we have used playgrounds developing the Topology app.
What are playgrounds good for?
They’re great to … play!
More exactly, they’re great when you want rapid, iterative development of a well-isolated module. This is often the case when you’re developing a moderately complex custom UIView subclass.
What are the benefits?
Speed. Although you could develop the view by repeatedly doing Build & Run on your app, you’d waste a lot of time compiling and then navigating through the app to the new view. So playgrounds can be faster, which keeps you in a state of flow.
Focus. Developing a view in the context of an app is distracting. Seeing and working on a single view in isolation help you focus on the problem at hand rather than get distracted by the rest of the app.
Enforced modularity. If you develop your view within your app, you will be tempted to think of the view as an outgrowth of your app, and to build it in such a way that it depends on your app.
This final point is an important one: you might build a view to be configured by your app’s model type, like your User type. Or you might place key logic in the view controller expected to use the view. But oftentimes this is not necessary and you’d be better off to develop your custom view in the way Apple would, with a clean external API that relies only on standard basic types like String and UIImage.
If you also need the view to have an API that does rely on the app’s custom types, you can layer that on afterwards with an extension. In fact, this more modular design is preferable.
But what’s not good?
That said, every rose has its thorns, and even your neighborhood playground may have a few inexplicable empty beer cans lying around by the preschool swing set.
First, full disclosure: Xcode playgrounds and Swift Playgrounds on the iPad are a bit unstable. Sometimes, even if you do everything right, they will crash or hang. In those cases, you have to quit your playground and restart. Sad, ridiculous, but true.
(Eric Sadun’s advice is excellent, so her simfix shortcut is certainly worth a try.)
Beyond that, the main downside is that developing UI in a playground requires a few tricks that are fairly simple but obscure and therefore easy to forget. The example playgrounds below show most of these, so hopefully they are a good starting point for your own exploration.
Key points to remember
Okay, let’s get to brass tacks. Here are the key points to remember when using playgrounds for UI development:
At the top of your playground page, you should import PlaygroundSupport.
To display a view or a view controller, assign it to PlaygroundPage.current.liveView.
To actually see the view in Xcode you need to reveal the Assistant Editor. CMD-OPT-<enter> will do this, or you can use the segmented control in the toolbar. Then make sure the dropdown in the jump bar is set so that the assistant editor shows a Live View, not a generated interface or something else.
You can include read-only assets like images by putting them in your playground’s Resources/ folder, then access them with the usual Foundation Bundle API.
You can also write to the filesystem by building a path based on the directory provided by playgroundSharedDataDirectory. Oddly, this will be the directory ~/Documents/Shared Playground Data and is shared across all playgrounds.
You may need to manually trigger layout. This is important but subtle. In an app, UIKit creates a run loop, which is always in the background, repeatedly running your layout and drawing code when needed. But a playground runs once, like a script. So you may need to manually invoke layout or drawing, for instance by invoking setNeedsLayout() and layoutIfNeeded() at the end of your script.
If you don’t want your playground automatically recompiling and re-running after every edit, which is the default, you should use the dropdown at the bottom of the edit window to switch the playground from Automatically Run to Manually Run.
You can also move helper code into Sources/. If your single playground page gets so long it takes forever to compile with every change, then you can move finished code into the Sources/ folder. This code will be compiled less frequently and run more efficiently. It will be automatically imported into your playground page as a module so you need to make sure the code there has a public API to be visible to the code in the page.
If you want to explore more advanced, asynchronous operations in a playground, like network downloads or video transcoding (we’ve done both!), you may need to set PlaygroundPage.current.needsIndefiniteExecution = true so the playground does not quit execution when it gets to the final statement.
Playgrounds of Topology
That’s a lot to take in. Here are three of the dozens of playgrounds that are lying around our repo, as remnants of earlier development. If you learn better by seeing real examples and tweaking them, download and try them out.
Chevron Playground
All of the views in The Chevron Playground were used for building components in an earlier version of the selfie-capture flow, the sequence of screens in the app that instruct the user how to take a seflie that can be used for our augmented reality virtual try-on experience.
Before updating the system to rely on real-time face detection and pose detection, we used music and visual cues to guide the user’s pacing as they turned their head. Visual cues means a lot of custom UI!
This playground was used to develop an early version of the “chevron”, a triangle that directs the user where to turn their head.
This is a simplified playground example: just a view that draws a triangle! But it shows a few important things:
How you can put all your view definitions and the view-hosting code in one playground page.
Using an image asset in Resources/
How to define a UIView based on a CAShapeLayer rather than based on drawing code in drawRect. (This has performance benefits that are probably irrelevant in most cases.)
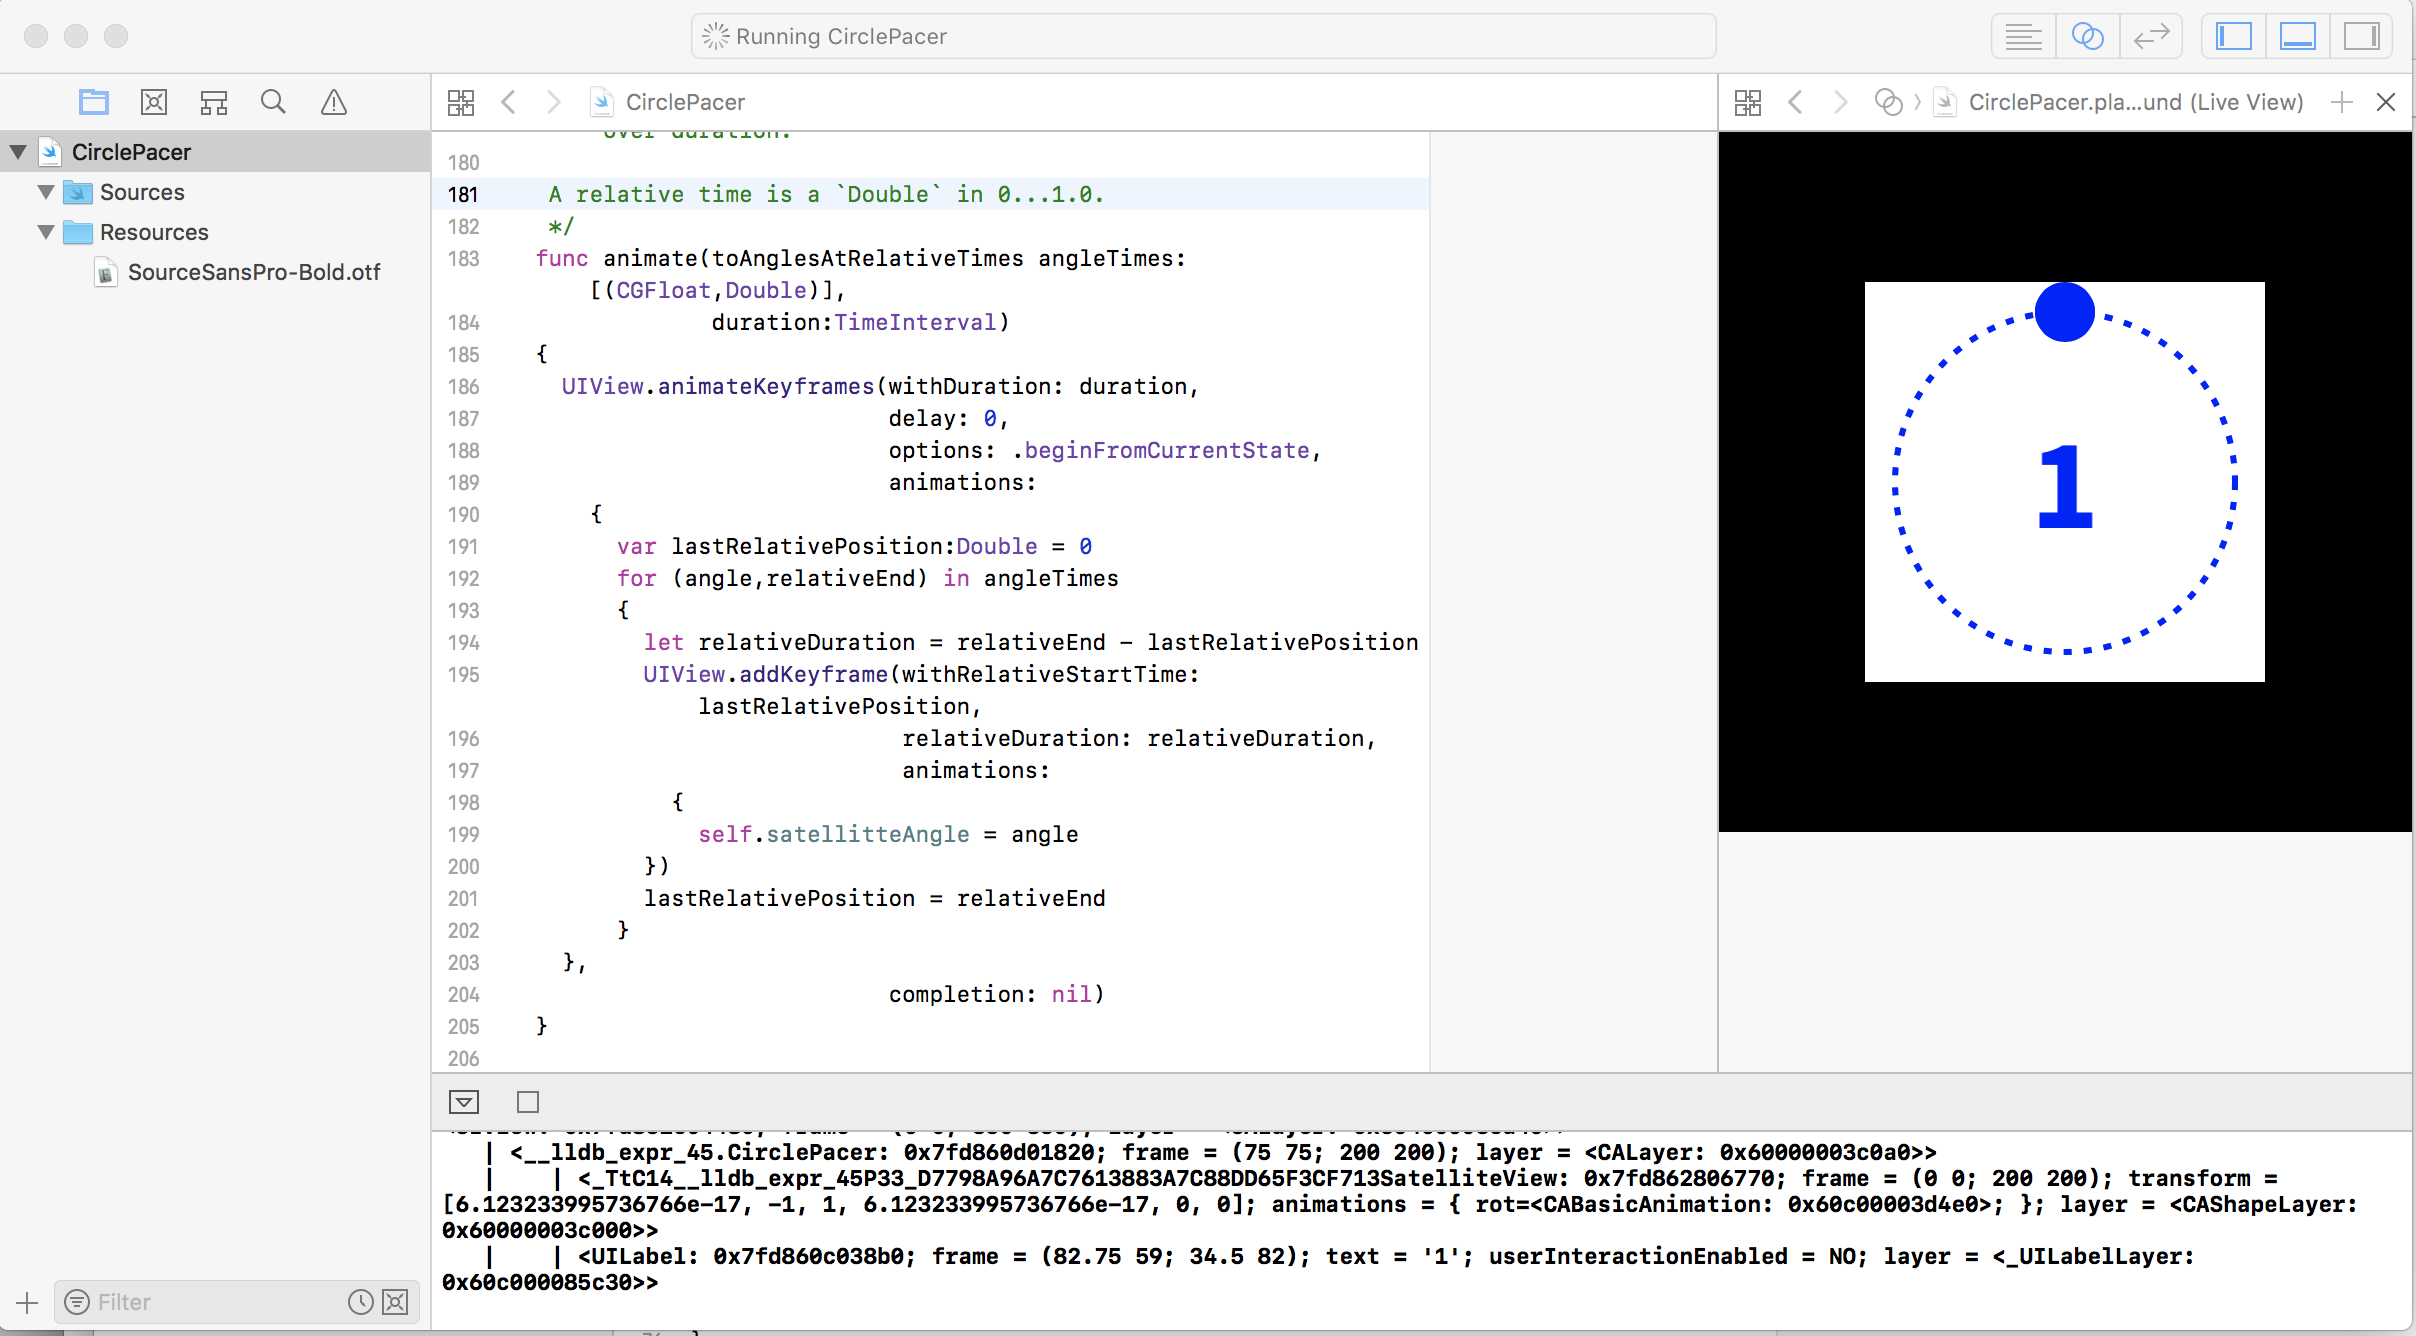
Circle Pacer Playground
The Circle Pacer Playground view shows a circle orbiting a circle with a countdown in the middle.
This playground shows the following:
Traditional drawing via drawRect (instead of using CAShapeLayer)
Manual layout without layoutSubviews
Font-loading on a playground, via an asset in Resources/
UIKit animation
Using Swift’s computed properties to create a natural external API
Chevron Edge View Playground
The ChevronEdgeView Playground uses the Chevron view to define a view that can present the hinting chevrons at the screen’s left side, right side, or both, and allows you to configure where the arrows are pointing, how big they are, and their color.
Probably the most interesting things it shows are:
Using Auto Layout to assemble constituent views into a responsive view
Moving helper code into Sources/, so only hosting code is in the playground page, so it operates only on the view’s external API
Drawing code to define shape views
The Limits of Playgrounds
To summarize, what’s good about playgrounds is that they provide isolation and rapid iteration. What’s bad is that they need a few tricks to be useful and that they become cumbersome beyond a certain level of complexity.
The tricks you only need to learn once – checkout the examples above.
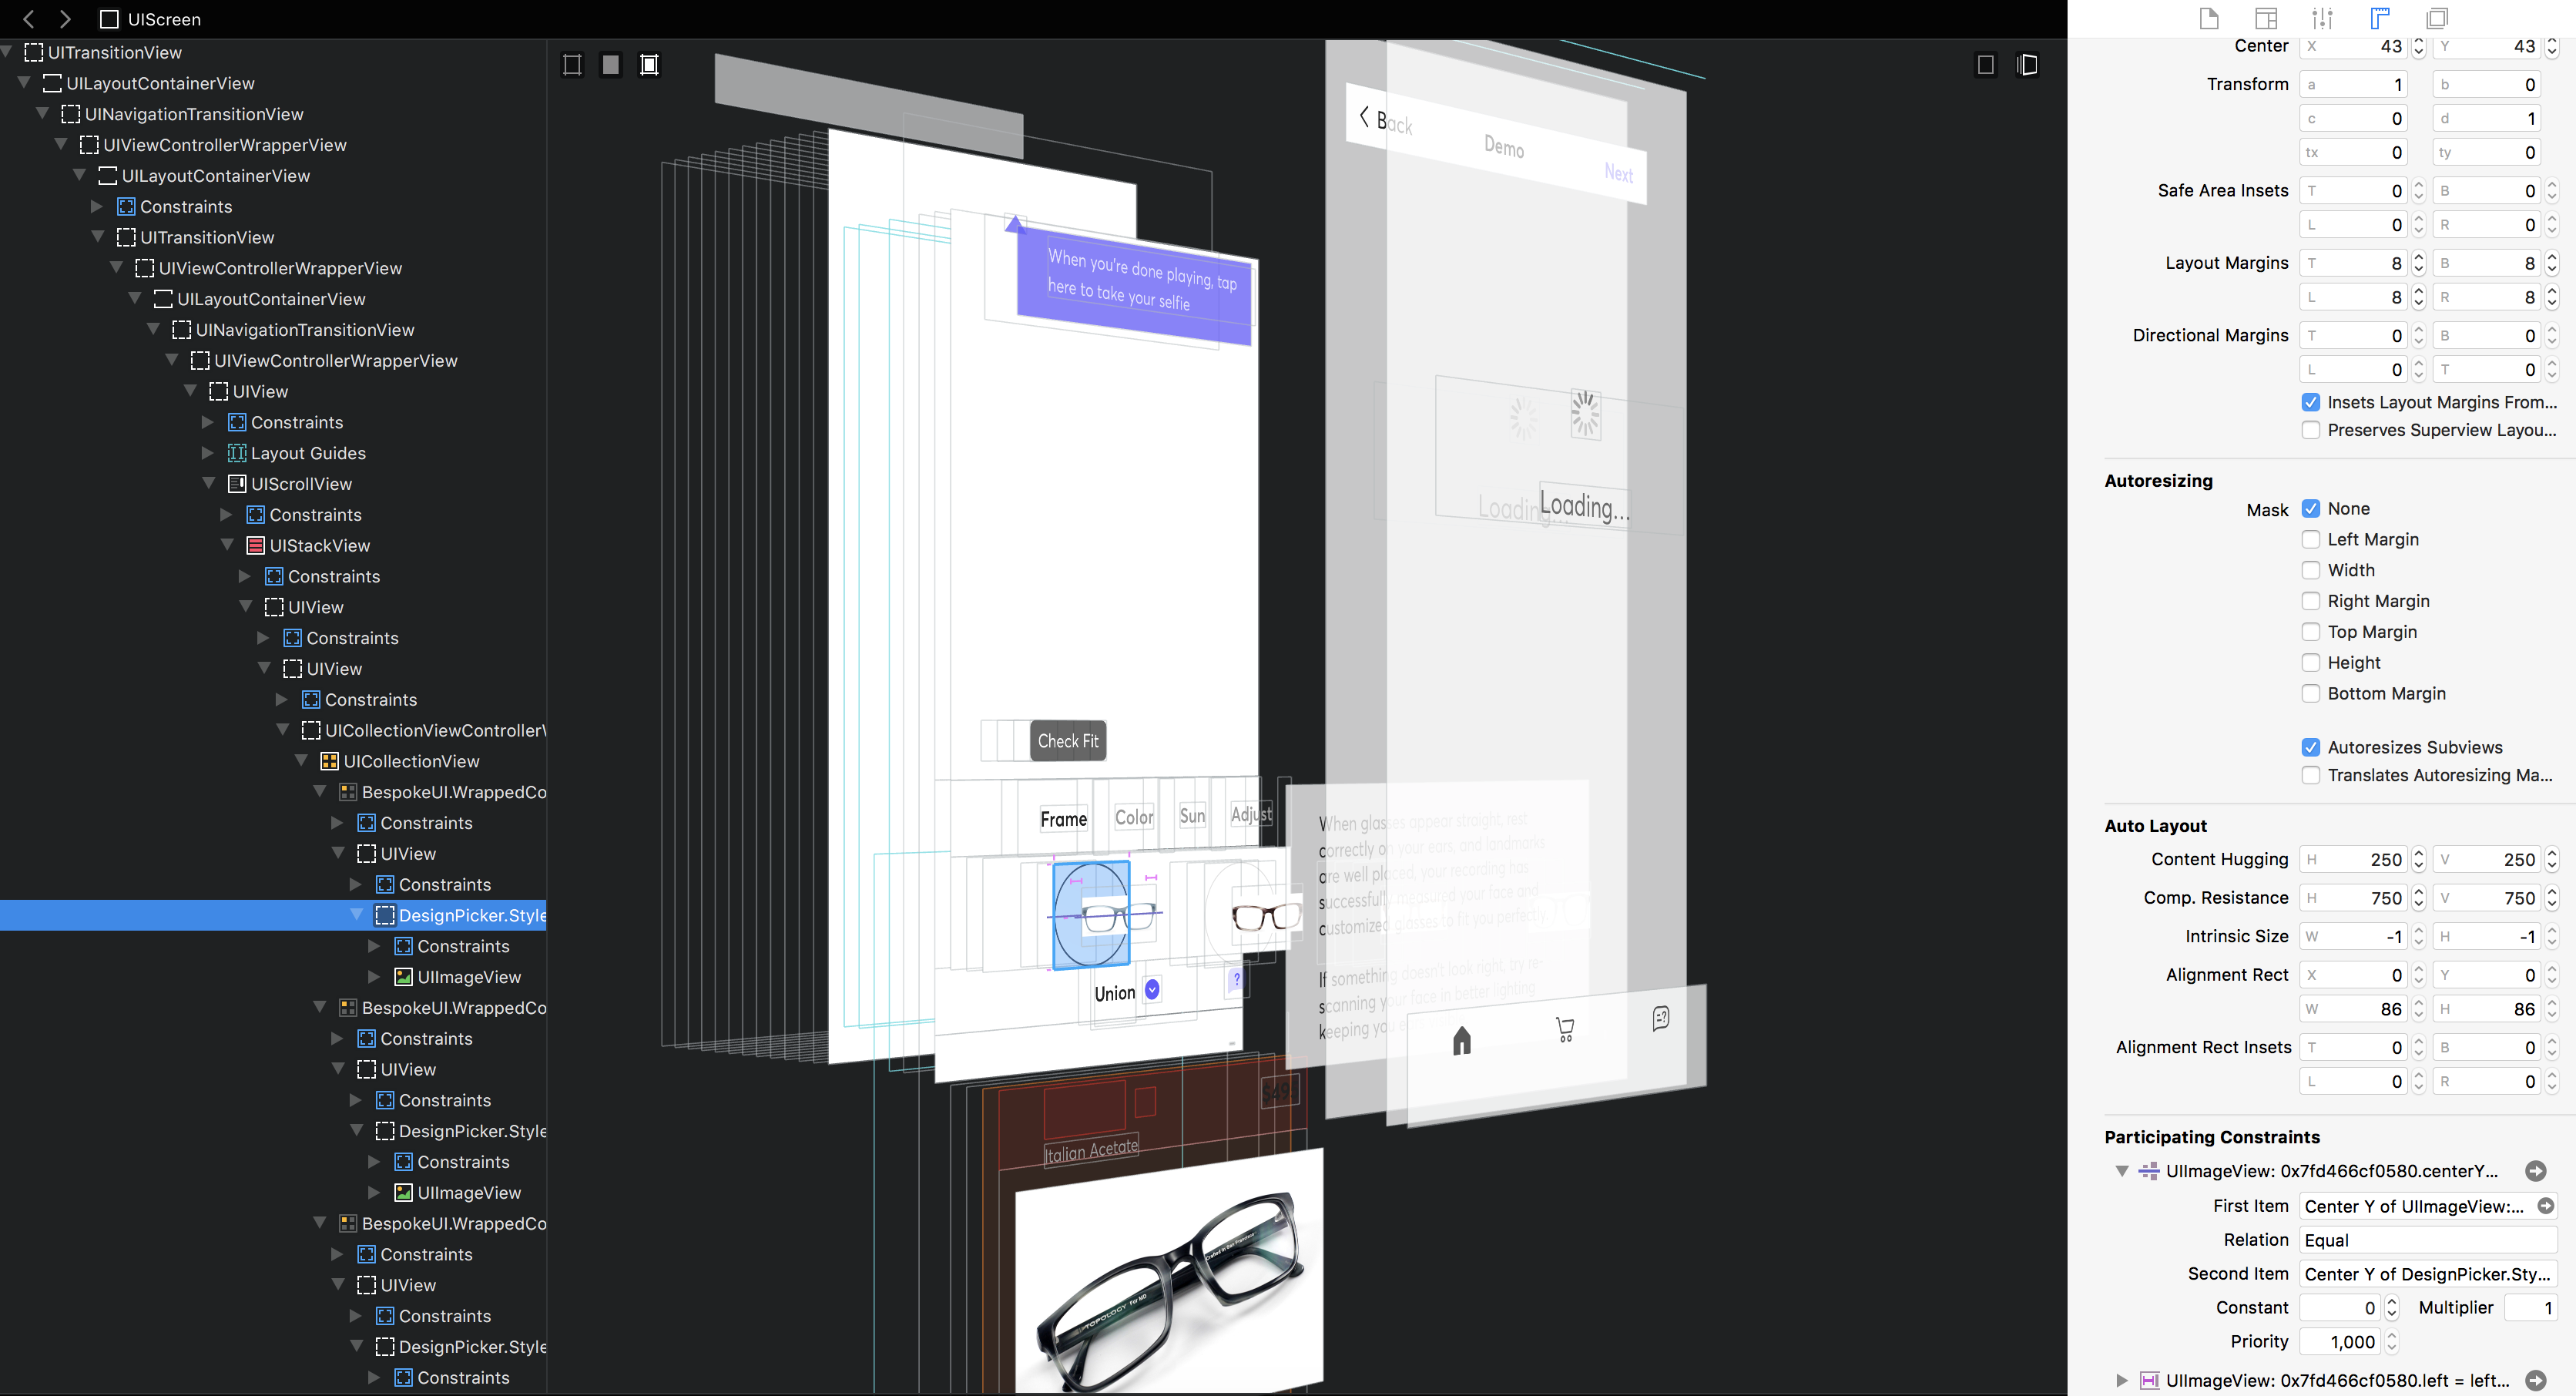
But the cumbersomeness problem increases with complexity. It’s because they recompile and re-run on every change, and because they run once rather than in an event loop. This means your code is in an execution context different from a plain old app. If you find yourself working in a very complex view, and playgrounds aren’t cutting it, it might be worthwhile to dump playgrounds and build an entire dedicated test rig app, an app designed to do nothing but host your view. This usually feels like it’s not worth the trouble, but then is. We’ve also done this more than once, such as for the card and article presentation views, and for the design picker view, which lets customers select the frame style, material, and lens for their glasses.
But really, you can stretch playgrounds quite far if you want to. For instance, this Synchronous Download Playground shows four different ways you can use Foundation API in order to wrap asynchronous networking code into a synchronous API. With methods like these, playgrounds can be quite useful beyond UI, even for iterating on networking code.
Beyond Playgrounds
It’s also worth mentioning the wider context. Swift Playgrounds are, for the moment, still catching up with what exists on other platforms. The interactive development workflow of playgrounds is just one incarnation of a general class of technologies for interactive computing, which includes the interactive prompt (or REPL, as lispniks like to call it) and notebook computing more generally.
In the JavaScript world, people use tools like CodePen every day to interactively develop, and share, pieces of code. The commerical system Mathematica has for years offered a comprehensive, well-integrated notebook-computing environment, which lets you mix text, images, code, and code outputs in one place. And right now, in the data science and machine learning world, the big story is the rise of Jupyter notebook, a powerful open-source notebook computing system. It supports multiple languages. It’s based on the browser and standard technologies like JS and Python. It’s tech stack is a bazaar, not a cathedral. Being based on the browser, Jupyter can integrate everything and is gradually doing so.
In fact, you can just barely run Swift within a Jupyter notebook. If you have Docker installed, this command will run a Jupyter server that offers either Swift 4.1 or Swift for TensorFlow: docker run -t -i -p 8888:8888 --privileged algalgal/swift-tensorflow-notebook:e539cdea6632
After a massive multi-day effort, our team found one of those rare bugs that turned out to be an issue deep in the compiler. My colleague Agnes took the lead to track down the issue and wrote up her findings about her adventures.
Now that the issue is fixed and the hard work is done, I can step in and do a little post-mortem. 🔎 What was the problem? What was the fix? What did we learn?
Smashing the Stack
The classic article “Smashing the Stack for Fun and Profit” from 1996 outlines a technique to execute arbitrary (and possibly malicious) code via a program that doesn’t do proper bounds checking. In the 20 years since, operating systems and programmers have become much more clever about stopping these exploits.
Sometimes though we’re our own worst enemies — reading past the last element of an array or an off-by-one error that writes past the end of a buffer is as easy to do as it was 20 years ago.
In our case, we were getting heap corruption errors, meaning something was accessing memory it shouldn’t be accessing. But Swift is a safe language, isn’t it? How was this possible?
To get to the root cause, we first need to understand two concepts: memory layout, and tail allocation.
Memory Layout
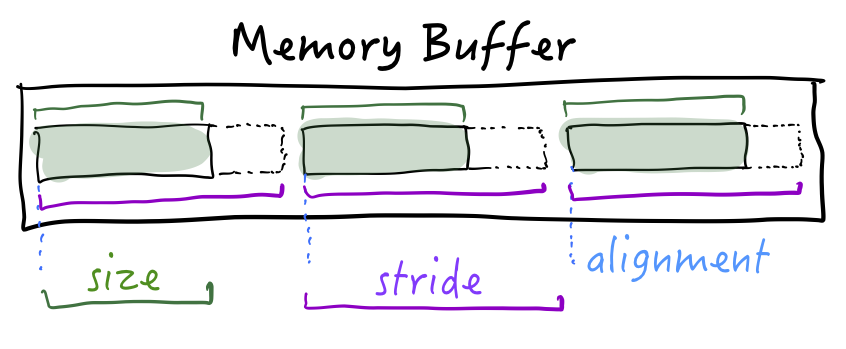
When instances are laid out in memory, there are several numbers to consider:
Size is the number of bytes to read so you have all the useful information.
Stride is the distance between two values. If you have a contiguous array of items, the stride is the number of bytes to advance to reach the next value.
Alignment helps determine where in memory your data can start. Depending on the type and the CPU, you could have requirements such as “data must start at an even memory address” or “data must start at a multiple of 8”.
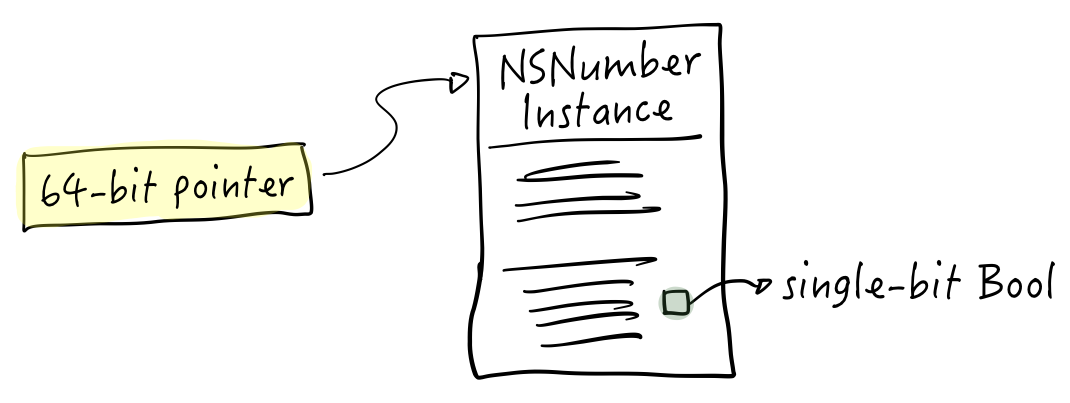
Do you remember tagged pointers from the Objective-C days? The idea was: why spin up an entire object just to hold something like an NSNumber containing a boolean? A boolean is a single bit, after all.
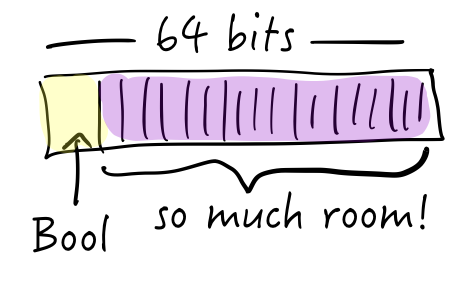
So on a 64-bit system, a pointer to an object takes 64-bits. But forget the pointer, we could store entire values with room to spare in 64 bits. Booleans, integers, even short strings could fit.
It’s a size optimization — although we could in theory address 264 bytes of memory (that’s 18 exabytes, or a 18 million terabytes), that’s overkill, isn’t it? Why not use a few bits for flags, leave enough space to address memory, and then you can support features like tagged pointers.
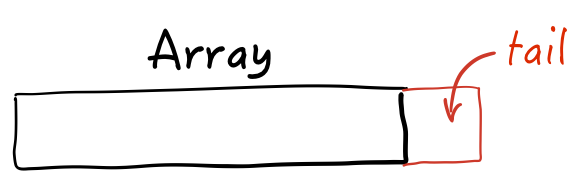
Similarly, when you allocate something like an array or dictionary in Swift you get a little extra space at the end.
Sometimes this is due to alignment: since the next thing in memory needs to spaced out a bit more, why not use that blank space “between” size and stride? Other times, the system might reserve a little extra space for expansion so you don’t need to do an expensive re-allocation and copy later. This extra space is the tail allocation.
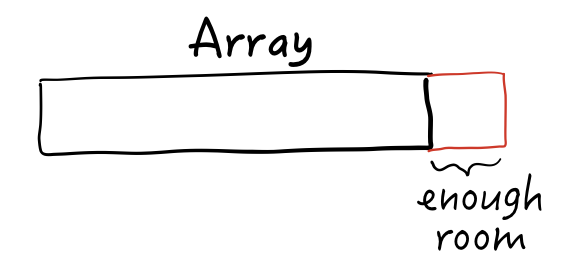
Let’s say you want an array in Swift. The runtime goes ahead and allocates some space, and also adds on some tail-allocated space. Here’s the method that does the work:
We’re passing in an llvm::Value for the size, and the function returns another llvm::Value representing the new total size. For example, you ask for a 44-byte array and the function returns a value of 48 to round it up to a multiple of 8. That’s four extra bytes of tail-allocated storage!
In practice, the system might add enough space for a few extra elements rather than just the “rounded up” space due to alignment.
Big Data
So, let’s say we have a array. We allocate enough space for some values:
Then the compiler helpfully adds on tail-allocated storage, enough to hold an additional value:
Now here’s the kicker: in our app, we’re storing values of double3 type. A double3 has a size and alignment of 32 bytes. But a 32-byte type will certainly fit in the tail-allocated space:
But it may not be aligned properly. At runtime, if the array decides to use its tail-allocated space it will also make sure to write that value to a 32-byte alignment boundary:
The tail-allocated size is sufficient, but the system didn’t take alignment into account. The alignment boundary we need is not at the start of the tail allocation.
The result? A buffer overflow. Corrupted heap. 💥
Alignment All the Way Down
What were the problems and solution here? Two things:
What gets stored in the tail-allocated space will affect the alignment of the entire type.
In the method declaration above, you saw how you pass in a size and get back a size. If you look at the commit that fixes the issue, the method now returns both a size and an alignment as a pair (aka a two-element tuple).
This change recognizes both size and alignment of the tail-allocated space when determining size and alignment of the overall space.
On Apple platforms, heap allocations are aligned on 16-byte boundaries.
That means your types that are 1, 2, 4, 8, and 16 bytes wide are also aligned. But a double3 needs to be 32-byte aligned. This second commit updates the runtime to call AlignedAlloc() rather than malloc() to ensure proper alignment.
I’m not a compiler engineer and I don’t know all the details about this bug, but I’m a firm believer in the value of reading code — especially code you don’t understand yet.
Tail allocation is a relatively new feature. It sort of bolts on top of the usual allocation flow, and there’s more code to follow and to understand to trace the thing end to end.
Sometimes this is a problem in my own code. Do classes have high levels of cohesion? Are related things close together, or separated by many frameworks and modules? How many files are there to go through and how big is the stack trace to understand some area of the code?
Learn how to trace values back in time.
Agnes covered the magic of going back in time (via TestFlight builds and version control) as a debugging tool.
Within your codebase, can you pick a variable and see its changes as it moves through your program? If the alignment is 1 at the beginning and 16 by the end, why? And how? Why isn’t it the correct value of 32? If the buffer looks correct before adding data and then has data written past the end after initialization, why? And how?
Learning how to use breakpoints, watchpoints, conditional breakpoints, etc. is invaluable here as you trace values over time.
Although it was tough work to track down this bug, I had a fun time doing a little digging after the fact on the cause and fix. I’m super impressed at how quickly it was fixed in the compiler and now look forward to the months ahead of a completely bug-free system. 😉
Thanks to my colleagues Agnes and Alexis for their help reviewing this article. All remaining errors are of course intentional and meant to test your attention. 😜
If you have questions or feedback for me, you can get in touch via Twitter where I’m @gregheo. If you’re interested in working with us — we’re hiring, and looking for an expert iOS developer. You could be working on the future of AR on iOS and writing about it on this fine company engineering blog!
A while back, we noticed an increase in crashes in our app. The crashes were marked as heap corruption, which makes them hard to debug — the location given in the stack trace (if any) can be far away in both code and time to where the problem actually lies.
After a long investigation down many paths, it turned out to be an issue in Swift itself. After sharing a few tweets about it on Twitter, I had a lot of people asking me for more details, so here I am, sharing the story of the mighty heap corruption issue.
Are you ready for a tale of woe, frustration, and ultimately, redemption? Are you curious about how other iOS teams — ours, in this case — investigate and track down bugs? Read on.
First, let’s have a look at what heap corruption is
Heap corruption occurs when dynamic allocation of memory is not handled properly. Typical heap corruption problems are reading, or writing outside of the bounds of allocated memory, or double-freeing memory. Since the result (e.g. a hard crash) can happen later, when the program tries to manipulate the incorrectly allocated piece of memory, the root cause of the issue can remain hidden from your eyes.
Gathering signal with crash reporting
It all started with reports from Crashlytics about an increasing number of heap corruption issues. The content of the issues was not helpful, because where it crashes has little relation to where the real problem is.
Once the number of these issues started increasing we started getting more and more nervous. Crash-free user sessions went down from almost 100% to 96% in a few months. 😨
The increase in crashes lined up with a Crashlytics SDK update, so I started by asking if anything might have changed on their end:
@crashlytics Hi there, we're seeing an increased number of crash reports in an iOS app in the past week, all coming from system libraries. Is there any recent change on your side that might make fabric send more system lib crashes? (could be just the latest iOS broke smthg, too)
Perhaps it was improved issue tracking? Maybe they enabled something that now sends us all the exceptions thrown from system libraries?
They were quick to respond and the answer was a definitive no. The problem was indeed our problem, and it had nothing to do with any change at Crashlytics. ✅
Try to reproduce the issue
By looking at the device types I realized we only had crashes on iOS 11 and only on older devices — iPhone 6, 6 Plus, 5S, SE, latest iPod touch 6 and iPad Mini.
Unfortunately, our older test devices in the office were all on iOS 10! We probably hadn’t tested the app on iOS 11 on any of these devices, ever.
Lining up the crashes with analytics events, it looked like the app crashed once people opened our Try On view, the AR view where you try on your Topology glasses. This seemed reasonable, as that screen is a heavy one full of Scene Kit and Metal, allocating significantly more memory than other parts of the app.
We were able to reproduce this crash ourselves, which was a great first step. Now we could start investigating which part of the code was the problem.
Go back in time
The classic way to track down the source of a bug is to bisect. Try a version of your app from last month, see if it crashes, and then try another one either before or after that. Eventually with enough tries, you can narrow it down to an exact commit.
I found a version of our app from eight months ago, before iOS 11 was introduced, and ran it on an affected iOS 11 device. It still crashed. ✅
The eight month old app was fine running on iOS 10 but not on iOS 11. Conclusion: something changed in iOS 11 to trigger the crash. Our working hypothesis was that iOS 11 uses more memory than iOS 10, and the increased memory pressure causes the app to crash on older devices.
Challenge every assumption
The team had a suggestion for me to validate the hypothesis: run the app on an iOS 11 iPhone 7, and get it to crash.
If memory pressure was the issue, I could malloc big chunks of memory and then enter our Try On view. No crash.
Our hypothesis was incorrect, but at least we had scratched off a strong possibility. ✅
Analyze and slice the code
At this point, we tried to think about how this problem could happen in the first place.
We knew there was something in the app that mishandled memory in a way that it corrupted the heap. Swift is mostly memory safe, so unless we were doing something exotic, we should be safe.
However, we did have some exotic code in there to examine for issues:
We reviewed all our code doing raw pointer handling. We have some C++ code and some low-level graphics code, both being good candidates for incorrect pointer usage, but all turned out fine. ✅
2. Thread data races
There’s a great tool called the Thread Sanitizer built in to Xcode that helps you find data race issues in your app. Unfortunately, it only runs on the Simulator and much of our app uses features that are unsupported there. The parts that do run in the simulator worked just fine and didn’t trigger any Thread Sanitizer warnings.
We manually tracked down every piece of concurrent code in our app, marking them as safe, or to be inspected. All turned out to be safe. ✅
Now what? 😳
Interlude
“What if it’s a bug in iOS 11?” - Eric, our CEO
Blaming the platform or the system frameworks is easy to do, but it’s such an unlikely occurrence. I just smiled at our CEO, saying “I don’t think so”, not knowing yet that he was very close to the truth.
Even if we immediately jumped to the conclusion of a Swift bug, we still needed to find a reproducible case to file a bug report.
Brute-force search
“When in doubt, use brute force” — Ken Thompson
Finally, I went to a tried and tested method: brute force. Also known as “ripping the app apart”. 🔪
Remove third-party code
I removed every third-party dependency, to exclude the possibility that the problem is not in our code. Luckily we’re very strict about not adding many third-party libraries and the ones we do have are mostly supporting easily isolatable code, like SSZipArchive.
Still crashing. ✅
Next, I removed our own framework of commonly used components.
Still crashing. ✅
Move suspicious pieces to an empty project
I was pretty suspicious about the heavyweight AR view, so I pulled it out into its own project.
Still crashing, great! ✅
I had a wild idea and removed the whole AR view.
Still crashing every second run. ✅ 😳
Confusion was now at its peak level. 🤯
If you get stuck, choose a new angle
At this point my most solid theory of blaming the AR view was ruined, so I had to try another angle.
The code was fairly slim at this point - a few thousand lines of parsing 3D models into all kinds of data structures. Nothing concurrent, everything running synchronously. I wanted to try and look at the crash site again. Even though I knew the cause of the heap corruption could be elsewhere, seeing the stack trace in the same piece of code every time made me want to look closer there.
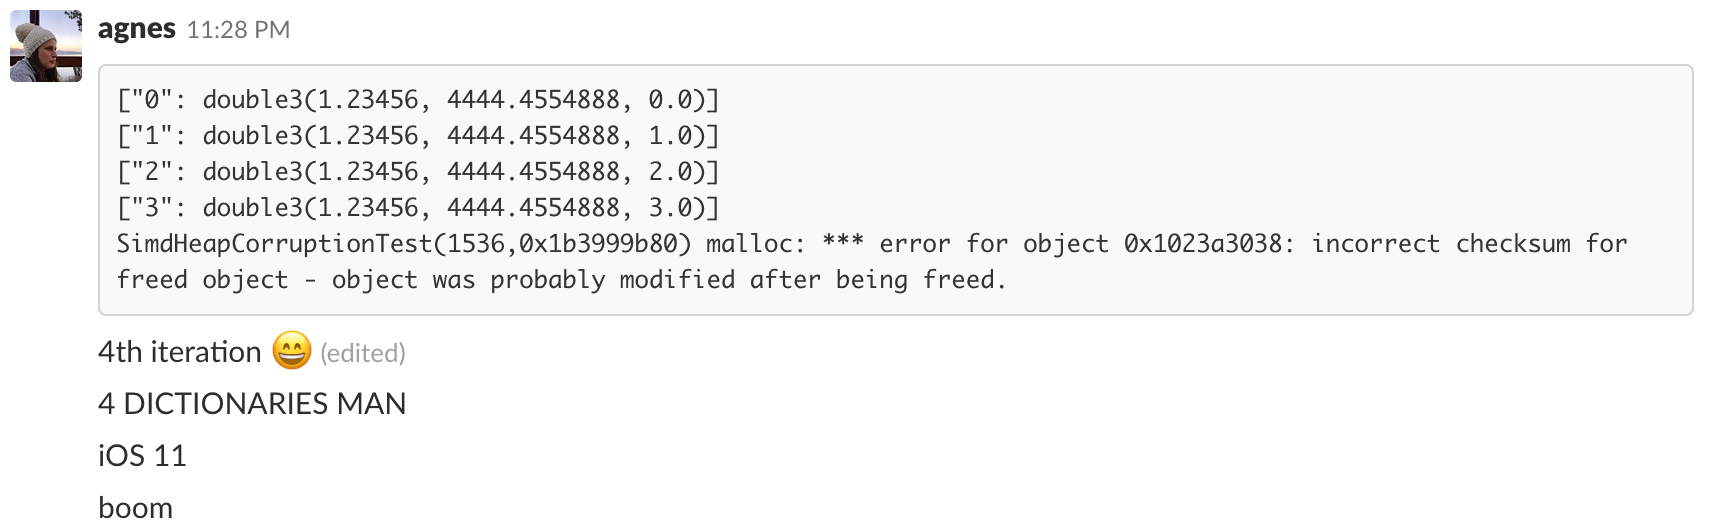
The pattern I started to see was that there was always a Dictionary involved, and there was always a simd type such as double3 in the dictionary.
This heap corruption issue is driving me crazy. Too many times in the past three days I felt like I'm almost there and then suddenly nowhere close to solving it. There's simd involved, crash is iOS 11 & low-memory-device exclusive, very tricky. Send help. 🧠
At this point, I was ready to give up after a week of this tiring hunt. 🏹🐞
But what if.. what if it’s really a Swift bug? 🙀
I opened up my MacBook again and tried something crazy.
Ten minutes later:
VICTORY! 🎊
Found the source of the simd heap corruption issue. ⚠️
Apparently, creating even a few instances of Dictionary<String, double3> on iOS 11 on iPhone6-ish devices results in heap corruption. Reproducible in five lines of code. Radar on the way, Apple folks. https://t.co/WCAP9qMfbd
Finding the problem was a significant chunk of work, but that’s not the end of the journey. There are a few things to do after you finally figure out what’s going on.
Workaround
Because hey, your users are still out there, crashing. 😬
For us, the workaround was to replace all double3 values to float3. After stress-testing dictionaries with float3 instead of double3 values, the app seemed to be stable.
We still had no idea whydouble3 in dictionaries was a problem, but we wanted to submit a quick fix to the App Store. This part of the story has a happy ending: ever since the change landed we’re back at a 100% crash free session rate. 😎
File a radar
The folks at Apple might be unaware of the bug, and there might be lots of people out there crashing for the same reason. They need your help to know if there’s something like this going on.
I’m lucky to have a friend and fellow Hungarian on the Swift standard library team, Karoly Lorentey, who reached out to me about the issue once I started tweeting about my progress. They were very excited about my findings, and once I submitted the bug report Erik Eckstein submitted a fix almost right away! The fix was shipped in Swift 4.1 and Xcode 9.3 beta 4.
I can confirm that the version of our app that used to crash before does not crash when built with the new Xcode beta. 🎊
Karoly was also kind enough to explain what the problem was, so let’s briefly go through the cause of all the heap corruption craziness.
The actual problem
The actual problem is not restricted to “old” devices. ❌ Every platform, and every device is affected. ✅
The actual problem is not Dictionary nor double3 specific. ❌ All collection types are affected, when storing types with alignments greater than 16 bytes. ✅
When their elements had unusually wide alignments, storage for the standard library’s collection types was not guaranteed to be always allocated with correct alignment. If the start of the storage did not fall on a suitable address, Dictionary rounded it up to the closest alignment boundary. This offset ensured correct alignment, but it also meant that the last Dictionary element may have ended up partially outside of the allocated buffer — leading to a form of buffer overflow. Some innocuous combination of OS/language/device parameters probably caused this issue to trigger more frequently — which is probably why it became noticeable on particular devices running iOS 11.
What is alignment?
Alignment defines the amount of padding needed to make data line up on “even” memory addresses. Processors are most efficient with memory access if your data is aligned properly; some can still work with unaligned addresses but there can be a performance hit. ARM is more strict for instance, unaligned accesses (when not allowed) will cause an alignment fault.
The fact is, that not many of the Swift types have alignments greater than 16 bytes. The reason why this issue occurred in our app is because we are using simd types extensively. simd types tend to have wide alignments.
Even though we tried debugging the problem with the Address Sanitizer and Instruments memory inspection, we never caught it. I wonder why. 🤷🏻♀️
Lessons learned
Identifying and fixing bugs is a big part of a software engineer’s job. We all know how to do it, but sometimes it’s nice to review some of the big-picture steps:
Make sure you’re gathering the correct signal.
Find a consistent reproduction case.
Bisect, or find another way to go back in time to track back the problem.
Analyze and slice the code, and always challenge your assumptions.
Work your way down to the smallest and simplest bit of problem code.
Document everything!
In the end, I had a simple project that exercised the bug along with copious notes, more than enough to file a bug report with Apple.
I learned that a methodical approach and a little brute force can wear down any problem.
And finally, I learned that sometimes your CEO can be right. Sorry Eric. 😉
If you have any questions, comments, or feedback regarding this article, you can find me on Twitter as @vasarhelyia. All very welcome. DMs are open, too. 💌 Thanks to my lovely team for polishing this article! 💜
There is a second part to this article coming up explaining what the problem was in more detail and how the Swift team at Apple solved it. 🤓 Stay tuned!
Ever since I put the effort into understanding Auto Layout, I’m significantly faster at writing correct UI code, sometimes even on the first try. Auto layout also saves me from potential errors from dealing with multiple size classes and frequent churn in our app’s design (we’re a startup, after all).
One alternative is traditional frame-based layouts, but they require manual updates for every single external change.
Another option is autoresizing masks, but they only support a limited number of simple layouts and view-to-superview relationships.
With Auto Layout, you’re able to create clean and reliable layout code no matter how complex your interface is. Here are five steps to take you to an improved UI coding life with Auto Layout.
1. Forget about frames, get your constraints together
Auto Layout is a set of constraints defining the location and size of views on an interface. Meaning, instead of defining the frames of your views in a hierarchy, you express their relationship to each other.
If your layout code is correct, everything will look as expected, no matter the internal, or external changes that might happen to them at runtime. Internal changes include things like content changes in a superview; external changes include things like device rotation or double-height status bar.
You have to build up a valid and non-ambiguous relationship for every critical attribute of a view in the layout, meaning every view needs to know its location and size somehow.
Critical attributes
Location
Size
There are several ways to make sure you provide the required constraints for both location and size. For instance, adding both leading and trailing constraints implicitly defines the width if the view it’s constraining to has a defined width. The view will stretch between those two locations. Similarly, adding top and bottom constraints will provide enough information to resolve vertical position and height, as long as the view it’s constraining to has defined top and bottom.
You can get the same layout in different ways; for example, you could set centerYAnchor for position along with a heightAnchor for size.
Make sure to understand the difference though. When external changes occur to your view, e.g. myView gets taller, relying on the top and bottom constraints will make the button stretch.
In the second case, it will preserve its height and always position itself vertically to the center.
Correctness
When using Auto Layout, the goal is to provide a series of equations that have one and only one possible solution. (Apple docs)
As with many things in programming, your goal should be correctness when it comes to layout. Make sure to address any Auto Layout errors or warnings on the console. Remember, if you get it right, you have it all, but while it’s broken, you have nothing.
Here are some common Auto Layout problems you may run into:
Ambiguous constraints have more than one possible solution.
Sometimes you might not have enough constraints for Auto Layout to determine size or location. In this case, you will have to add more constraints to uniquely specify the required attributes for every view. Xcode spits out a whole bunch of complaints, noting where your layout is missing attributes. 👍
Unsatisfiable constraints don’t have valid solutions.
Sometimes you have too many constraints. So many, in fact, that they conflict with one another! In this case, you need to revisit, and remove the unneeded constraints.
translatesAutoresizingMaskIntoConstraints = false
Never ever forget to set this flag for all the views you want to involve in your layout definitions. It is true by default, and if not set to false, your constraints will be in conflict with the ones translated from the default autoresizing masks. It’s usually a painful realization when forgotten, after debugging mysterious layout errors for a while.
tfw every stack overflow answer suggests setting translatesAutoresizingMaskIntoConstraints to false
From design to development, consistency all the way ✅
Auto Layout as a paradigm is also consistent with how designers think about layout. All numerical values I apply to the layout code these days are copy-pasted paddings from Zeplin, where designers share their final work with us, developers. We’re on the same page now. 💞
2. Know how to activate your constraints
Depending on where you add the constraints, you are able to define internal and external relationships for a view. This makes a very important difference in some cases, that you’d normally not want to deal with.
That’s why NSLayoutConstraint.activate() is the recommended way to install constraints. In the old days, you added constraints to views directly but then you had to worry about the fact that those constraints could only apply to the receiver subtree.
In the modern world you should let the Auto Layout system decide what view to attach constraints to by using NSLayoutConstraint.activate().
3. Make safe area your best friend 🐶
With safe areas, you don’t have to care about what’s outside of them.
A safe area defines the part of the interface where you’d normally want to add views and other content. Safe areas play well with Auto Layout because you can define constraints to the safe area margins. No matter what external changes happen to your layout, like a navigation bar being suddenly hidden, it’s not your job to figure out how to accommodate the changes.
Anything you tie to the safe area stays within the safe area. It’s now more important than ever before, because the iPhone X’s top and bottom “unsafe” areas cannot be calculated from just knowing how tall a navigation bar is, which used to be good enough to work with.
iOS 11, but all devices
Safe areas are new in iOS 11 and I initially thought they were defined for the iPhone X only. Turns out, they’re not!
If you still support iOS 10, you can use OS availability calls around your safe area code and then use good old UILayoutMargins otherwise.
When you drop compatibility of some OS version, you can remove those code paths. This is much simpler than keeping track of individual devices.
Navigation bar, status bar
The navigation bar and status bar are both part of the unsafe area. If you print out the safe area’s insets while presenting a navigation bar and a status bar on a view controller, it’ll say something like 64 (navigation bar 44 + status bar 20) for top and zero for bottom for non-iPhone X devices.
In theory, it should define the exact same area as layout margins would, in case of non-X devices.
Scrollable views
It was a big debate at the office that once again Alexis won, when I was struggling with a fairly complicated nested scroll view setup. He said he would expect a scroll view to be aware of the safe area by providing default insets to adjust to it. He was totally right, and so make sure to read how it works in iOS 11. Basically, there’s a flag named contentInsetAdjustmentBehavior that tells whether the given UIScrollView instance does that, or not.
4. Use UILayoutGuide for more complex layouts
When trying to achieve something more complex, you can create your own layout guides. These come in handy when trying to eliminate hard-coded magic numbers from your layout code to make your code easy to understand, easy to change, and less likely to break when circumstances change.
Dropping “dummy views”
Imagine UILayoutGuide almost as a view that’s invisible, except it’s not in the view hierarchy. Most of the times, you would create a “dummy view” for the purpose of positioning or sizing a view easier, relatively to that helper view.
Let’s see our example:
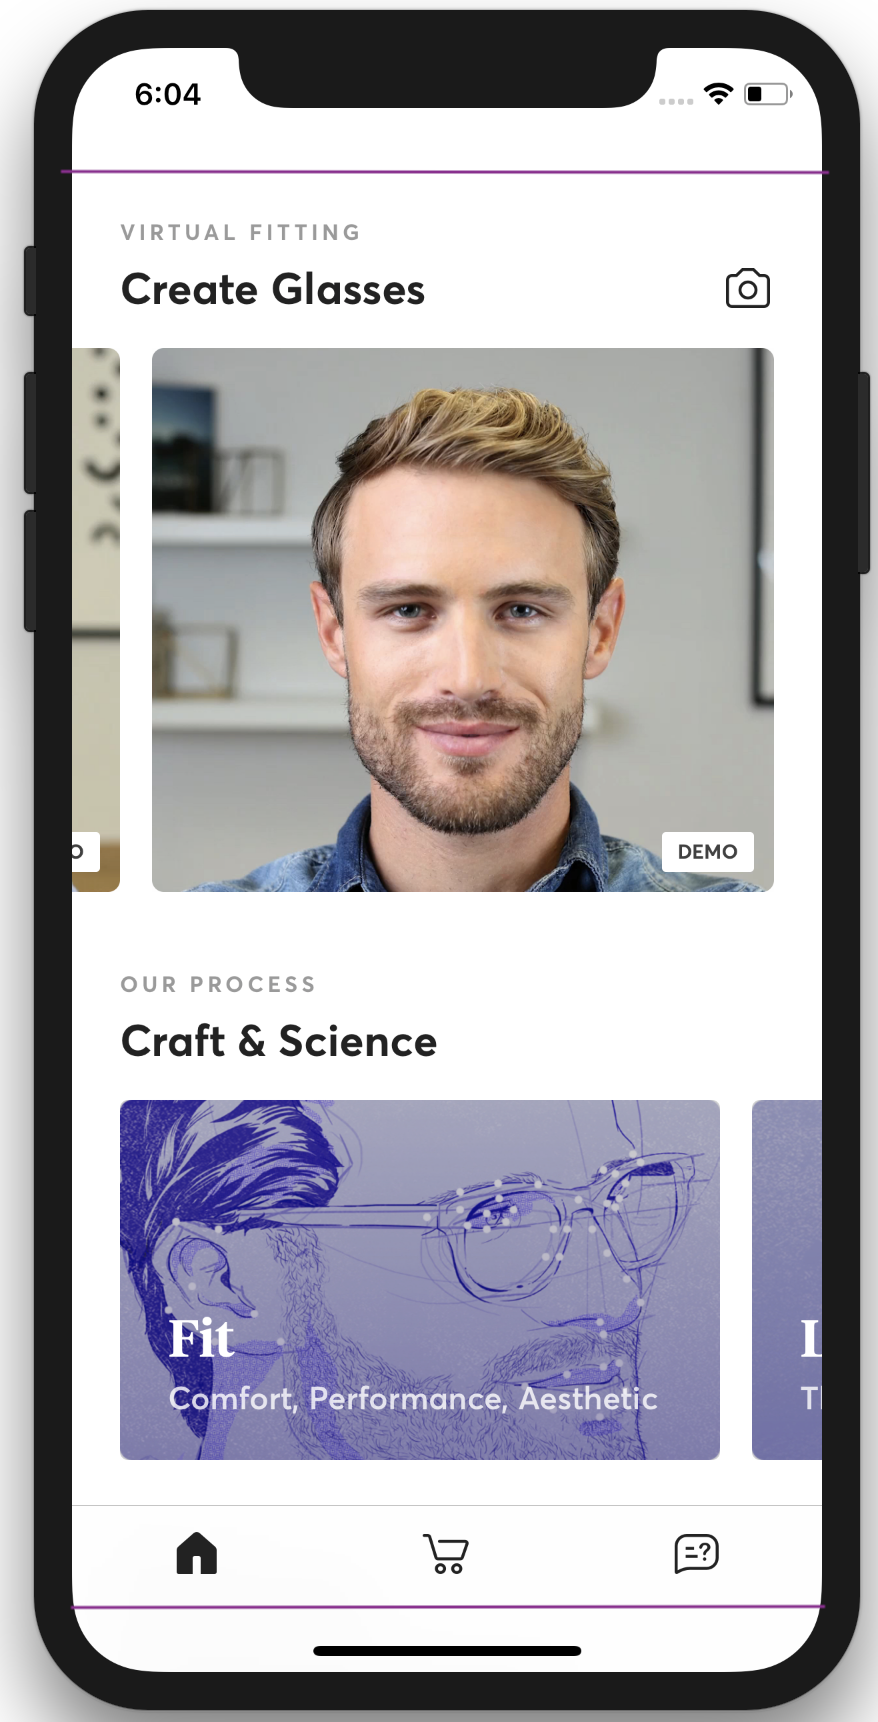
We wanted a constraint that expresses the height of the safe area plus the height of the bottom unsafe area, which is the bottom safe area inset’s height. That constraint would be there to provide the height constraint of the bottom part of the whole vertically scrollable area what we call the Try-On/Product Info, see the video above. The top view being Try-On, the AR view of your face with our glasses on, and the Product Info at the bottom, that provides content on frame styles, lenses, materials, etc. We wanted to extend the Product Info view into the bottom unsafe area, to make it scroll underneath it.
Because view.safeAreaInsets might change over time, you would need to update the constant of this constraint when that happens. iOS provides a callback for that purpose.
This is one way to go about it, but this is something that’s non-trivial to understand by just looking at the code. Following the Auto Layout guru, Alexis’s suggestions, we went ahead and defined a UILayoutGuide for the same purpose.
1
2
3
4
5
6
7
8
9
10
11
12
let safeAreaExtendedToBottomLayoutGuide = UILayoutGuide()
Now you have a layout guide that has the height of the safe area plus the bottom unsafe area. That height is now used to define myView‘s height, without having to store and update constraints later.
5. Get your visual debuggers running 🛠
For the times when you’re not entirely sure what’s going on, there are tools to help with debugging your issues. You can browse views visually, look up constraints, frames, or memory addresses, which have all been super helpful many times in the past.
Honestly, I couldn’t go back to the way I was writing layout code before. I was mixing autoresizing masks with Auto Layout, sometimes just specifying frames when that seemed to be enough. It was always tons of work to write, and painful to maintain.
Also there is so much more to this topic. The slightly controversial UIStackView, content hugging priorities, modifying constraints on the fly, and more. If there’s interest out there, I could write a second part to this article. Let me know!
If you have any questions about Auto Layout, or how to do this, how to fix that, I’m happy to help! 🙋🏻 You can find me as @vasarhelyia on Twitter. DMs are open, too. 📨
I first heard about background transfer when I was giving a ⚡️ talk at Realm back in 2015. Gwendolyn Weston gave an excellent presentation on background transfer services later that day. Her talk was the first resource that I looked up a few weeks ago when we decided to implement background transfer support into our most precious Topology Eyewear app. 📱 👉 👓
It’s been a journey full of surprises and learnings, and felt like something worth sharing.
The idea
Let me give you a little context on why we wanted background processing. The main user journey in our app is
Our user takes a video selfie.
She waits with the app open while the video is uploaded.
The server processes the video.
Once it’s finished processing, she can virtually try on, design, and purchase her perfectly fit Topology glasses right in the app.
We warm up the robots to start the manufacturing.
So the app has a video to upload to a server and then download the result, when that’s ready with processing the video. The result is the 3D model of the user’s face that we render the glasses on, in the AR view you can see below.
Since it’s critical to be able to upload and download files in this flow, we used to ask users to “stay on this screen” during step 2. That works but it’s not the most premium experience. And when someone’s on a bad network, it gets more and more annoying. We are talking about a few megabytes up and then a few megabytes down, but that translates to minutes on a slower network connection.
Since it “takes forever”, users background the app no matter what you ask from them. They have other stuff to do on their phones, but backgrounding the app when you don’t support background transfer simply causes the transfer to fail.
Accurate notifications
Once the upload succeeds, the computer vision algorithms work on the video. It takes approximately 1 minute per video, but this is not always the case. It’s not that the processing work is so unpredictable; there might be all kinds of other delays adding up to the final processing time, delays which the iOS app is unable to anticipate. But since the server keeps working, it can deliver background content updates that let the app fire local, user notifications once everything’s done.
So the plan was to support a flow like this:
User takes a selfie video, immediately presses home (backgrounds the app).
App uploads selfie in the background.
When processing is done, the server sends a silent push notification to the app.
App downloads the 3D face model.
User sees a notification, opens the app, and everything’s ready.
Good news, this is how the app works today as of v1.1.4! 🎉
Bad news, it took us weeks to figure out because certain pieces of this puzzle were under-documented, almost impossible to debug, and nerve-wracking to test. At the end, we needed to implement some fallbacks because the flow above turned out to be the very, very optimistic scenario.
The best news is, we are here to share the story, so you can spare some time and headache in case you were about to jump into implementing background transfer yourself.
“Background transfer to the rescue!” – famous last words
Background transfer is the ability to transfer data over the network when the app is in the background.
As a reminder, iOS applications have several app states:
Active: receiving events in the foreground, executing code.
Inactive: not receiving events, but can execute code for short periods of time. A brief state between active and background.
Background: background, executing code if background transfer is on and implemented.
Suspended: background, not executing code.
Not running: application is not running at all.
When your app is not in the foreground (active, inactive), it normally goes to sleep (suspended) quite fast. When memory runs low, the system might decide to terminate your sleeping app, especially if it consumes large amounts of memory in the background.
Memory consumption is not the only factor when iOS is judging your app. What also counts is the time your app spends executing in the background and the number of times it wants to be woken up. Keep these in mind when implementing background transfer, because you will want to be a good citizen. iOS ranking your app down means delays in your background execution window, and as mentioned, sometimes might lead to termination.
Switching to background sessions will just work, right?
A background session is what lets you manage the work to be done in the background through the URLSession API.
I started implementing this feature after reading the Apple docs. I updated all our URLSessionConfigurations, replacing “default” to “background,” and waited for everything to work. It was compiling fine, with no sign of the weeks of work ahead. Clear skies, sunshine – I was full of hope. 🏖
And then nothing worked, for reasons. Not just one reason, but many, many reasons. In the end building this feature required diving a lot deeper than “just looking at the API docs”. It ends up providing an interesting tour of parts of iOS that are not very well known, since they work so hard to disappear… into the background. Let’s take them one by one.
Fancy using completion handlers? Don’t!
“With background sessions, the actual transfer is performed by a separate process.”
A background task is the unit of work represented by an URLSessionTask object, created on and managed by a background session. The task doesn’t know about the parent session being a background session; it’s the same kind of task you’d use either way.
But since your app’s process is not running this transfer, if your tasks are using the callback based URLSession APIs, it’s time for a refactor! Background sessions don’t support the callback based APIs. It’ll produce a runtime error if you try them. They cannot call back to a closure that no longer exists, which is the case if your process was terminated.
You can make it work with URLSession delegates. The system decides about whom to notify and when, after all tasks for a given session are complete. If the tasks finish while your app is running in the foreground or the background, the session notifies its delegate you have previously set, immediately. In case your app was terminated in the background, the system relaunches it at some point, and notifies the AppDelegate that all tasks are complete, to let you process the results there.
I started suspecting this was going to require a bit more than just changing one configuration. And then more problems started to surface.
Anyone else noticing urlSession:task:didCompleteWithError: not getting called on errors in sessions configured to background?
“Why do my background tasks complete 30 mins late?”
Our next question was, why sometimes background processing took so long.
“For time-insensitive tasks, you can set the isDiscretionary property. The system takes this property as a hint to wait for optimal conditions to perform the transfer. For example, the system might wait until the device is plugged in or connected to Wi-Fi.”
This was something we realized way too late – the importance of the isDiscretionary property on URLSessionConfiguration. It defaults to false. But if it’s set to, or treated as beingtrue, then it tells iOS, hey, no rush, take your time with delivering the information that our app is waiting for in the background.
“In cases where the transfer is initiated while the app is in the background, the configuration object’s isDiscretionary property is treated as being true.”
If you scroll up to our very, very optimistic processing plan, you can see that the foundation of our background flow is based on immediate stage progression. Meaning, once the background upload is done, we initiate a task in the background to launch the compute job on the server. Once that’s done, we initiate the download task in the background. Now you see what the problem is. It all gets delayed based on the iPhone’s mood and now we’re back to square one with our premium user experience. 🤦
There is no way around this.
😬 😱 😳 🤔
Let’s just take a deep breath and think about the reasons.
iOS provides a premium experience to its users. Part of it is keeping our greedy hands off the resources. Imagine when your battery is dying, you barely have network, and you are waiting for your Lyft to arrive. Do you want iOS to upload videos in the background, or do you want it to suspend everything else and let you do your thing? You’re paying full attention to the app that is in the foreground, after all. This is how iOS helps you as a user to achieve that. That’s the reason why people buy iPhones – because it works.
As a third party app developer, you need to understand the limitations this implies.
So how do I know if my tasks eventually went through?
To find out when your tasks did complete when your app was terminated while doing background transfer, you can implement that one function on the AppDelegate for handling the results of those sessions. The tricky part here, is that it provides a completion handler that’s very important for you to call it as soon as possible. Remember, iOS judges you if you spend too much time executing code in the background. This is how it measures it.
If you’re interested to see how much time you have left in the background, there is a public var on UIApplication.shared, called backgroundTimeRemaining. It’s good to know, but you better aim for never reaching that limit.
Silent pushes – they arrive whenever they feel like it!
How does iOS punish you? One way is by not waking you up in the background to receive silent push notifications.
Silent pushes are the only way to wake up your app from your server, indicating there’s work to do, such as download data. This was exactly what we needed, to tell the app to download the server’s computer vision results.
We already know the system can terminate our app when it’s in the background, or suspended, and the user can also terminate your app using the multitasking UI. In both cases, the app’s process is killed, and then it never receives silent notifications again.
But even if the system does not terminate your app, it can still simply never wake it up, or wait hours to wake it up, for delivering silent notifications.
Before describing some of the normal practices that can surprisingly provoke this punishment, let’s review the details of silent push.
No need to ask for permissions
First of all: it’s unrelated to user permission. You can registerForRemoteNotifications and receive a device token allowing you to send remote silent notifications to a device, without asking the user for permissions.
To do this, you just need to make sure to format your APN payload correctly on your server. Setting content-available to 1, and not adding any alert methods, is how you let iOS know what kind of push message it is. See Configuring a Silent Notification in the docs for more details.
You will be notified when your push arrives to your app, through a function on AppDelegate. Same game as with the function for background session completion, you will be passed a completion handler that you must call, the sooner the better. Remember, iOS is watching you. ⏱👀
Background fetch, update, refresh?
To support silent notifications, you’ll need to turn the Background Modes capability on, and select “Remote notifications”. Despite what others might tell online, you won’t need to turn “Background fetch” on. It’s a slightly different thing, essentially handled the same. Background fetch is also a way to update content in the background, but scheduled by the app (poll), not initiated by a server (push).
After enabling the silent push capability, you can see that your app appears on the list of apps using background app refresh in the Settings app. If the user turns that switch off there, you won’t receive the silent notifications.
Device tokens do not identify the device
For supporting any kind of push notifications, silent or not, you need to install certificates on your server communicating to APNs servers. You will need to point your app built for development to a server that has the dev certificate installed and communicates to the sandbox APNs. You will need to point your production app to a server that has the distribution push certificate installed and communicates to production APNs. This could be the same server, but then the server needs to know if it’s a development or production app talking to it.
This is because anything built from Xcode, no matter the configuration (yes, Release too!) will be considered as development and will result in a Bad device token error on your server if you try to send push messages to the production APNs environment. This is because iOS gives you a device token valid for development when asking from a dev build, and a device token only valid for production APNs when asking from a production build. So a device token alone doesn’t identify the device. For that, you need the token plus the knowledge of whether it came from a development or production build.
Don’t forget to call registerForRemoteNotifications on every launch, the token can change across launches.
Client authentication does not work 🔓
The biggest surprise of this journey was when authentication between our app and our server broke the minute we switched to background sessions. It stopped working in both the foreground and the background.
Since we believe in the highest level of security possible, we don’t trust anyone 🙃. We had implemented certificate pinning to ensure that the app only talked to our server, and client certificate authentication to ensure that our server only talked to our app. This meant we did not even need to trust the certificate authorities.
But it failed silently inside the completion handler of the URLSession callback for authentication challenges, and produced a log message on the console like CredStore - copyIdentPrefs - Error copying Identity cred. There was no way to understand what the problem was. But we had a wild guess: it turned out using a CA-signed certificate instead of pinning to a self-signed one works.
But according to Apple, server trust validation should work in the background. Bug filed (35126815), because it only seems to be working with CA-signed certificates. Pinning to a CA-signed certificate is possible too, even if you have a rolling certificate (like Let’s Encrypt) in place, as long as you’re pinning against the public key, rather than the certificate itself. You just need to make sure the public key stays the same across all new certificates. Here’s a great article explaining why certificate pinning is a good way to defend yourself from man-in-the-middle attacks.
Peter needed to change our servers to use a new certificate and new authentication methods. That’s quite some work on the backend for supporting the app’s background processing capabilities. 😬
Even standard server-trust authentication will punish you
But even after re-engineering for only what works, we learned that iOS will still punish you for some approaches that are fully supported. Any server-trust authentication is unwise.
“For background sessions specifically, the resumes necessary to handle this authentication challenge counter against the resume rate limiter. Note This applies to all authentication challenges, not just server trust challenges.”
Just one last thought before jumping to our next section about the mysterious resume rate limiter… 👻
As Quinn suggests,
“I generally recommend that folks avoid authentication challenges and instead implement a custom authentication scheme.”
For example, to send a custom header field with a transfer token as authentication, that was previously provided by the server in a foreground session. There are more suggestions in that thread to provide better security without risking smooth background processing by hitting the resume rate limit.
The little-known Resume Rate Limiter is the thing that will punish you
Remember metric number three from the list of what to look out for with background transfer – the number of times your app wants to be woken up in the background? That is what the resume rate limiter is there to watch and to regulate.
It all started to make sense… 💡
You give iOS a piece of data to upload to, or download from a server. Your app goes to the background. iOS has a great deal of resource management implemented, so it is able to find a way to transfer that data with low priority, when it’s convenient to do so. All it needs to do is wake your app up and notify the proper delegate.
“N downloads, 1 resume.”
Except, if you’re implementing things like the authentication challenge, for those URL requests.
“N downloads you need N+1 resumes.”
These things add up, and iOS will just rank your app down, delaying your execution window. Let me show you how bad we, at Topology, are doing with resumes:
Upload task completed
Data task for job submission authentication challenge for server trust validation
Data task for job submission completed
Silent remote notification arrived
Download task completed
This is 5 background resumes if the user has only submitted one selfie before going to the background.
The punishment is (1) hidden by Xcode, (2) varies by phone, and (3) is severe and random
These three facts above makes you very frustrated when testing, because it starts getting worse as you test more. We unfortunately realized this after a few days of struggling with debugging the uncatchable issues.
A funny sign was that after building the first internal testing version, others saw the whole flow happening, but not me. You can imagine what iOS on my phone was thinking about the Topology app after working on this feature constantly for weeks. My resume rate limiter was probably like “Lol, Topology app. No way! Too much!”
But your app will always resume in the background at the expected times if you’re plugged into Xcode. 🚨
That was a shocking find too, because we had no idea about the rate limiter until that point, when we realized background features just don’t work reliably in TestFlight builds. It’s because you have a free pass with the rate limiter when running in the development environment. In practice, it meant that all of the planned background processing worked in production as expected, except that we could measure the time between stages, as stretching to hours sometimes.
“dasd” is the best friend you didn’t know you needed
My teammate Christopher showed us this great debugging move, where you can find the Duet Activity Scheduler Daemon’s logs on the device’s console that’s responsible for delivering notifications in iOS. From that you can extract information about whether your messages went through or not, and why. There is a score, e.g. 0.76 for every notification, and a decision, like Can Proceed. That verified all our theories we’d been putting together from the guesses we had about how the system works.
1
2
3
4
5
6
7
Nov 6 14:19:32 vasarhelyias-iPhone-7-Plus dasd(DuetActivitySchedulerDaemon)[123] ...:[
{name: ApplicationPolicy, policyWeight: 5.000, response: {Decision: Can Proceed, Score: 0.58}}
{name: DeviceActivityPolicy, policyWeight: 10.000, response: {Decision: Can Proceed, Score: 0.25}}
Since we can’t rely on users walking around with fully charged iPhones connected to excellent WiFi with all their apps closed and not supporting background updates, we needed to add some fallbacks to support the non-optimistic but common scenarios. Still, this is already a huge improvement to how our app used to work, especially for the worst case scenario. 🎊
The UX workaround we have now is to schedule local notifications with estimated end dates for the computing phase, so we don’t rely only on the silent push to trigger the stage progression of the selfie. That allows users to go back and open the app when most of the work is done and let them watch the app downloading the 3D face model.
The most obvious improvement for the future is to decrease the number of resume attempts necessary. That involves changes on our backend to provide a different API and functionality to support fewer stages of job processing on the client. Also, we could make changes to how authentication works, like implementing the suggestions by Quinn about the transfer token. Good thing we always have more coding to do! 😬
I hope this was helpful in understanding our process and what we learned about background transfers. If you have any questions or suggestions, please do let me know! 🙏 You can find me as @vasarhelyia on Twitter.
Special thanks to Alexis and Greg for helping me making this article awesome! 🤗